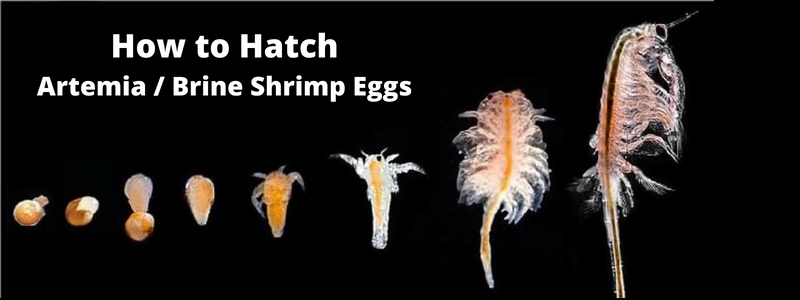
How to Hatch Artemia Eggs (Brine Shrimp Eggs) For Live Feeding
Artemia also known as brine shrimp is an aquatic marine animal found in high-salinity seawater. Brine shrimps (artemia) are the preferred live feed in the fish and shrimp hatcheries. Brine shrimps are highly nutritious which helps fish and shrimp larvae to grow faster.
Fish and shrimp larvae are very small in size and cannot feed them the commercial feeds that are available on the market. So natural feeds are preferred i.e. Phytoplanktons and Zooplankton. Brine shrimps are being used as live feed for a long time in hatcheries.
Brine Shrimp Eggs or Artemia Eggs are available in aquaculture shops or online eCommerce stores. These eggs come in airtight tin or polythene packets. Brine shrimp produces dormant eggs, known as cysts and these eggs can be stored for a long period of time and hatched on demand under favorable conditions. When these artemia eggs hatched out into small orange color animals, we call them “Nauplii”. 1 gram of Artemia cysts contains approximately 1,80,000 nauplii and 10-100 nauplii are fed to shrimp larvae depending upon the shrimp larvae size.
Buy Artemia Eggs (Brine Shrimp Eggs) Online
Artemia eggs or brine shrimp eggs are widely available online as well as in offline aquaculture stores. Brine shrimps are one of the best live feed sources for shrimp larvae, fish larvae, and aquarium fishes. That’s the reason the artemia eggs are very high in demand as one of the best live feeds.
You can Buy Artemis Eggs directly from Amazon. Before buy Brine Shrimp Eggs, validate the packaging date, reputation of the vendor, and reviews of the product. There are many vendors who sell low-quality artemia eggs whose hatching rate is very low, you need to avoid to buy artemia seeds from them.
Material Required for Artemia Eggs (Brine Shrimp Eggs) Hatching
Before I show you how to hatch artemia eggs, let’s understand what are materials required for the hatching process. Here is the list of materials required for brine shrimp egg hatching.
- Good Quality Artemia Crys (Buy Artemia Eggs)
- Glass Beaker
- Freshwater
- Chlorine (Bleaching Powder)
- Seawater or Salt Water 25-30ppt
- LED Light 2000+ LUX
- 100 Micron Filter Mesh
- Baking Soda
- pH Meter (buy pH meter)
- Air Pump (buy Air Pump)
- Refractometer or Digital Salinity Meter (Buy Refractometer Online)
- Power Backup (UPS or Inverter)
Step by Step Process How to Hatch Artemia Eggs (Brine Shrimp Eggs)
After collecting all the required ingredients, let me show you the step-by-step process to hatch artemia eggs.

Step1: Measure the number of artemia seeds required for harvesting as I said earlier 1 gram of artemia seeds can produce 1,80,000 nuapliis

Step2: Prepare 5 liter 25ppt saline water (Add 1gm salt in 1 liter of water to increase salinity to 1ppt) i.e. you need to add 125grams of salt in 5 liters of water to make 25ppt salinity and measure pH of the water using pH meter, if it’s below pH7 then add Sodium Bicarbonate to bring it pH 7 – pH 8.5

Step3: Soak the artemia seeds in fresh water for 30 minutes so that its outer cells will be soft for easy hatch

Step4: After 25 minutes of soaking the artemia eggs, prepare chlorine water i.e. 1 gram bleaching for 1 liter water, for preparing 5 liter chlorine water you need to add 5 grams of bleaching

Step5: After 30 minutes of soaking in fresh water, filter the artemia seeds in a 100-micron mesh

Step6: Now dip the soaked artemia eggs into prepared chlorine water for 30 seconds, not more than that

Step7: Clean artemia seeds with fresh tap water after soaking them for 30 seconds in chlorine water

Step8: Add the artemia eggs into the 5 liters 25ppt salinity water and run the aeration 24hrs, ensure the air pump is connected to power backup for continuous power supply

Step9: Connect LED Light 2000+ LUX on top of the container as it creates the required environment for hatching

Step10: After 24hrs, if the artemia seeds are of good quality most of them will be hatched. fill the beaker from the hatching tank you will see the live artemia seeds
How to Harvest Live Artemia (Brine Shrimps)
During the 24 hours of the hatching process, most of the artemia eggs will be hatched and ready for live feeding. When all the artemia eggs hatch, the egg cells will remain in the tank. Now you need to only filter the live artemia, not the dead cells. So stop the aeration for a while and put a light source on the bottom of the container as the artemias get attracted to the light source and dead egg cells will be floating on the surface. Using the siphoning process you can take out all the live artemia from the tank and feed them to your animals.
If you are using in Biofloc System, then you don’t have to do the filtration, after artemia is hatched, directly you can transfer to the Biofloc Tanks for feeding your animals. Depending upon the usage you can use any methods you like.
This concludes the how to hatch artemia eggs in a very simple and easy way. If you have any queries, you can put in on the comment section of this blog, I will try to respond your queries as earliest as possible.
